Laminate floors are produced in accordance with accepted industry standards which permit tolerances not to exceed 5%. Prior to the installation of any laminate flooring product, the installer must determine that the job-site environment and the sub-surfaces meet or exceed all requirements as stipulated in the following installation instructions.
We do not accept responsibility for job failure associated with sub-surface or job-site environment deficiencies. The installer/owner has final responsibility as to grade, manufacture, and factory finish. It is imperative to use reasonable selectivity and hold out or cut off pieces with glaring defects.
When ordering herringbone laminate, a minimum 10% should be added to the actual area needed as allowance for cutting waste and/or mis-manufacture.
Should an individual piece be doubtful as to grade, manufacture or factory finish, the installer should not use the piece.
DO NOT INSTALL ANY QUESTIONABLE OR DEFECTIVE PLANKS.
It is the fitter’s responsibility to check the moisture of the concrete and other conditions before laying the floor.
Before You Start – Job Site Inspection
Acclimatisation
The laminate should be stored horizontally in the room in which it is being fitted for at least 72 days before installation. The floor should be stored within a temperature range of 18-22 degrees Celsius and between 40-60% relative humidity. Not acclimatizing may cause excessive expansion and contraction. Do not open the packs prior to installation.
Evenness and Cleanliness
It is imperative to ensure your cement or wood sub-floor is level (within 3mm over 1 metre). You should also make sure that it is clean, dry, and secure. Failure to do this can result in edge damage to the boards or noise-related issues such as squeaking. The fitter is responsible in ensuring the floor is level and clean. Any remaining residues or dirt should be removed.
Sub-floor Moisture
VERY IMPORTANT! The moisture of any concrete/cement floor must not be over 3% (2.0% C.M.). This should be tested with an appropriate moisture metre, such as a Tramex Concrete Encounter. See below scale:
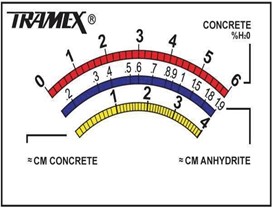 If the cement sub-floor moisture level is too high, either wait until dry or use a Liquid PU Primer, which will seal cement floors up to 6% moisture on the Tramex Concrete Encounter Red Scale. For pump/liquid (calcium or anhydrite) based screeds, the moisture level should be 0.5% CM (0.3% CM if the floor has underfloor heating) on the Tramex Concrete Encounter Blue Scale. PU Primers are not suitable for use on liquid calcium/anhydrite screeds.
Appropriate timber sub-floors include WBP/Marine Plywood or OSB Grade 3. Construction Plywood is not a suitable sub-floor due to its high moisture content. A moisture check should be done on all sub-floors prior to installation.
Room Temperature and Humidity
The temperature in the room must be at least 18°C, and the relative humidity between 40–60% for a minimum of 14 days prior to the installation of the flooring, as well as during and after the fitting. Fitters should carry out these tests. Other works such as plastering and painting should be finished prior to laying the laminate
Inspect Flooring
Prior to installation, you should inspect each board in daylight for any visible faults or damage, and also check the colour and finish. Once a board is fitted, it will be deemed as acceptable. It is the responsibility of the fitter and the end user to ensure that the grading of the floor is correct. Always select boards from different bundles to ensure an even appearance. NO CLAIMS ARE ACCEPTED ONCE THE FLOORING BOARDS HAVE BEEN INSTALLED.
For general laminate flooring installation, please refer to our guide to laying laminate flooring.